Custom Actions
This guide explains how to add a custom Third-Party Actions to your Superflow Flow Builder using the available interface options. Third-Party Actions are reusable API endpoints of a specific Provider. You can define the path, inputs and the expected return values.
Custom Third-Party Providers and Actions are managed on an Workspace level. Changes affect all Apps as soon as they are republished.
Add a Custom Third-Party Action
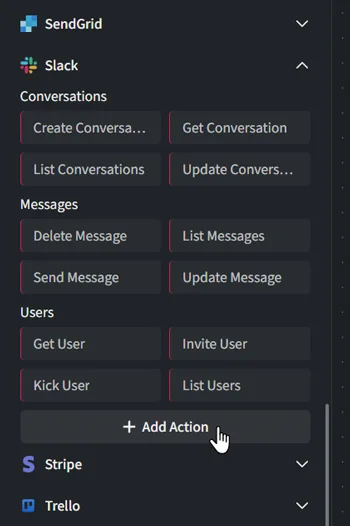
- Navigate to the Flow Builders Actions Tap, scroll down to Third-Party Actions.
- Click on the “+ Add Action” button that is shown underneath the Provider you want to add your Action to.
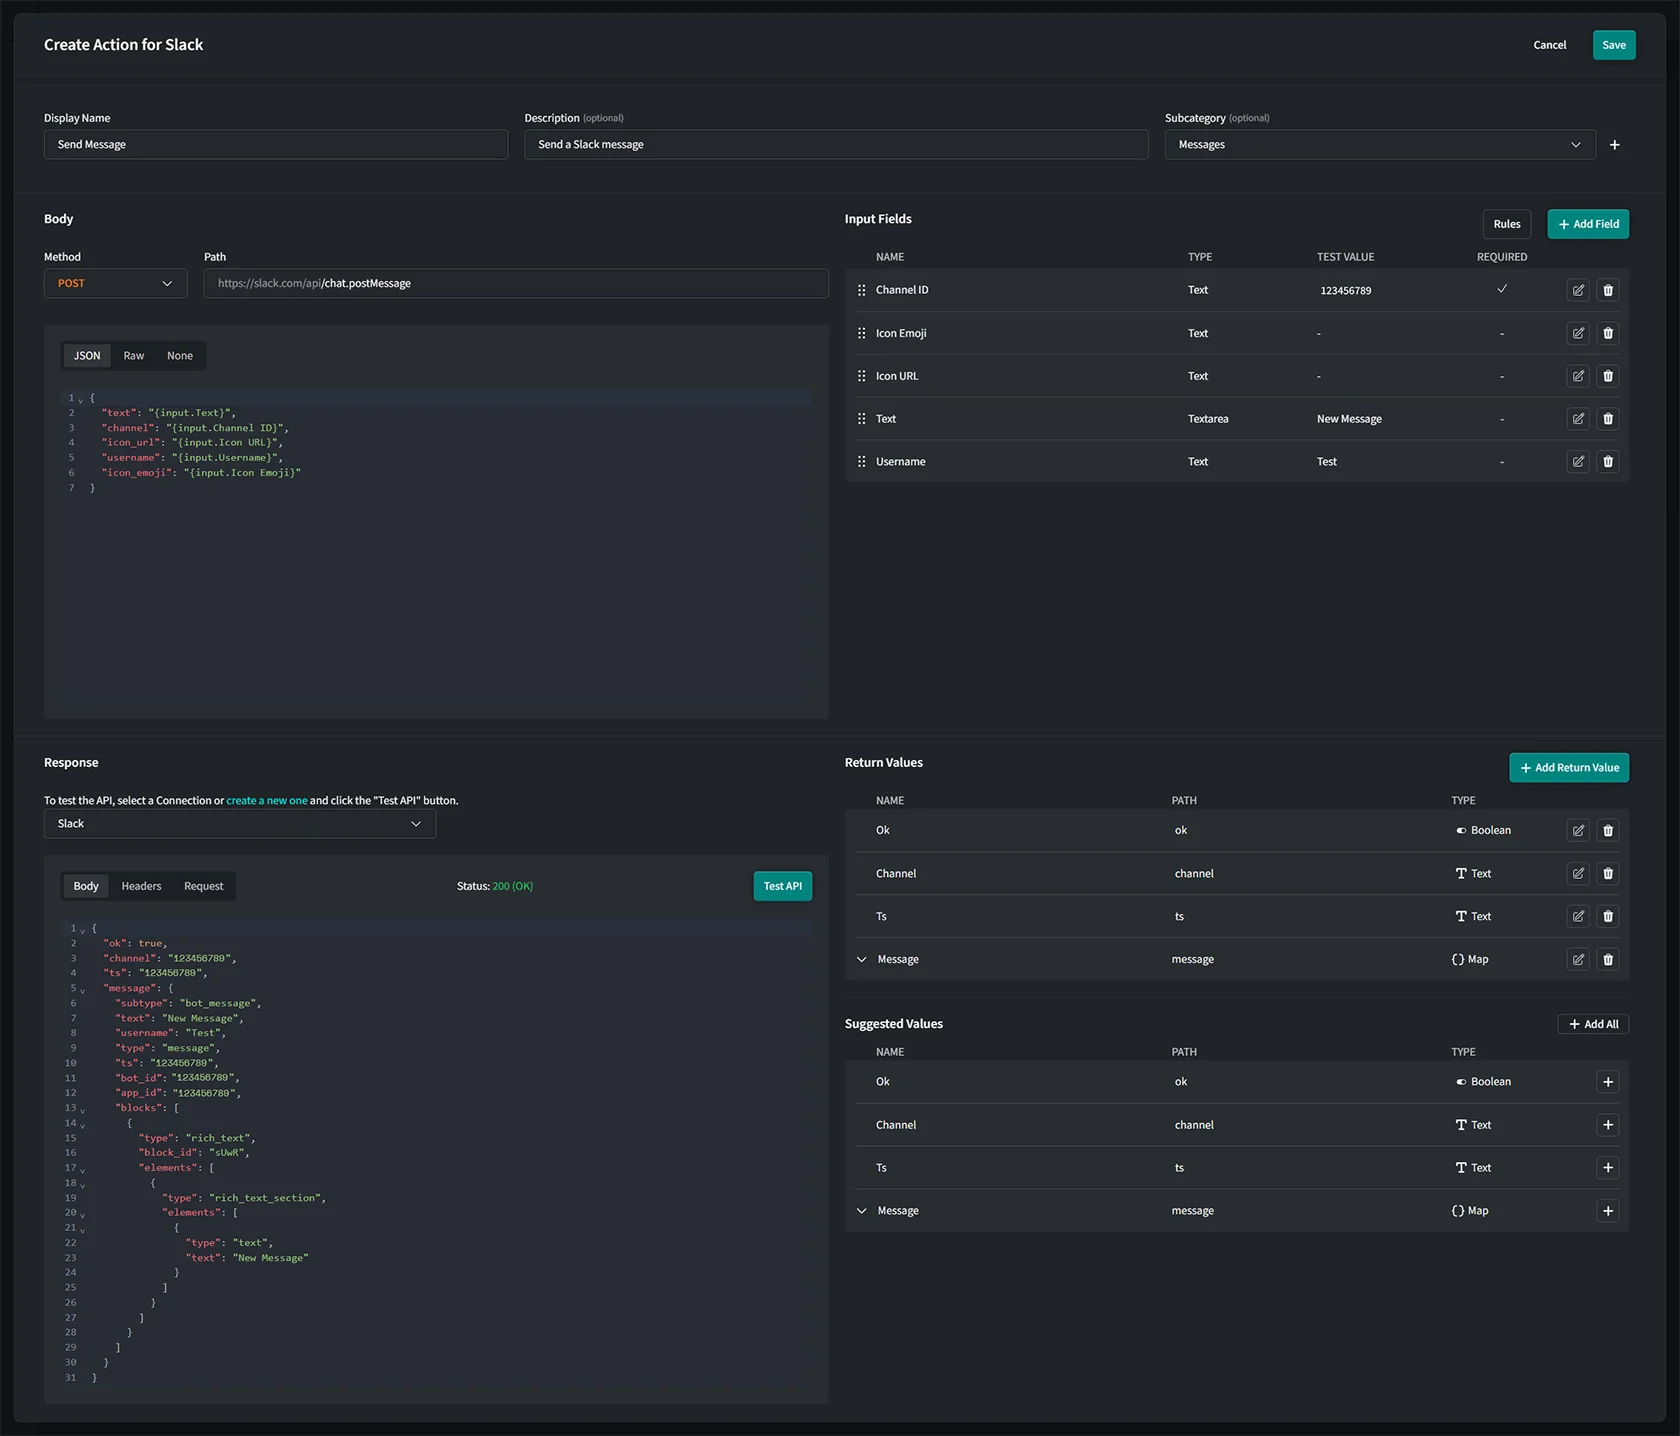
Basic Information
- Display Name: Enter the name of the Action (e.g., Send Message).
- Description (optional): Provide a brief description, such as "Send a Slack message".
- Subcategory: Select a subcategory that best fits the Actions’s functionality.
Body
- Method: Define the method of the API request (not available with GraphQL).
- Path: Define the path for the API request. Be sure to start your path with a backslash ("/"). You can use Provider parameters and variables (drag & drop) within your path as well as input variables from your input fields ("Insert Variable" button in input list).
- Type: Select the type of your body (e.g. JSON, Raw, None). When "None" is selected, no body will be sent.
Once you selected the type of your body, you can define the payload of the body itself.
Use of Variables
- You can use Provider parameters and variables (drag & drop) within your schema as well as input variables from your input fields ("Insert Variable" button in input list).
- Lists and maps from your inputs can be used as a whole by inserting them directly at the highest level or you can use specific values of your input lists and maps.
Example of the use of input variables in a JSON body:
{
  "myText": "{$input.my_text}",

  // Use of the entire map
  "entireMap": "{$input.my_map}",

  // Accessing specific values of your map
  "specificMap": {
    "name": "{$input.my_map.name}",
    "description": "{$input.my_map.description}"
  },
  // Use of the entire list
  "myList": "{$input.my_list}",

  // Accessing specific values within the map within the list
  "myList": [
    {
      "name": "{$input.my_list[n].name}",
      "description": "{$input.my_list[n].description}"
    }
  ]
}
Modifying Input Variables with Modifiers
- We've also added support for modifiers, allowing you to transform your input variables directly within your schema. This functionality uses a syntax inspired by Shopify Liquid. While not all modifiers are implemented yet, the following are currently supported:
date: Format a date string.replace: Replace all occurrences of a substring.replace_first: Replace the first occurrence of a substring.replaceRegx: Replace using a regular expression.reverse: Reverse an arrayjoin: Join an array into a string.uppercase: Convert text to uppercase.lowercase: Convert text to lowercase.capitalize: Capitalize the first letter of the text.camelcase: Convert text to camelCase.
Example of the use of input variables in a JSON body:
{
  // Formatting a date
  "new_date": "{$input.date | date: '%a, %b %d, %y'}",

  // Text transformations
  "to_uppercase": "{$input.text | uppercase}",
  "to_lowercase": "{$input.text | lowercase}",
  "capitalize": "{$input.text | capitalize}",
  "camelcase": "{$input.text | camelcase}",

  // Array transformations
  "reversed": "{$input.array | reverse}",
  "joined": "{$input.array | join: ', '}",

  // String replacements
  "replaceRegx": "{$input.text | replaceRegx: '[a-z]', '*'}",
  "replace": "{$input.text | replace: 'world', 'superflow'}",
  "replace_first": "{$input.text | replace_first: 'world', 'superflow'}"
}
Modifiers are applied by appending a pipe (|) followed by the modifier name and any required arguments.
By leveraging these modifiers, you can simplify your workflows and reduce the need for additional processing steps in your Flows.
Input Fields
You can add input fields to your Actions. These will be shown in your node settings, when you use your Actions in a Flow and can be used in your request body or URL path.
- Name: Give your input field a name.
- Type: Select a input field type (e.g., Text, Number, List, Map ... ).
- Placeholder: You can define an optional placeholder for the input field.
- Test Value: Optionally you can define a test value. This is used for testing and matching of the response later on. Required fields need a test value for a test to work.
- Lists can only have one sub item. This sub item will define the type of all sub items. Otherwise the list will accept every type.
- Maps can have multiple sub items or can be a simple key value pair (setting "Is Key-Value Pair" required).
- Description: Add an optional description to your input field.
- Required: Decide whether an input is required or not.
Response
Once you have configured all the fields and settings above, you can test your request with your test data and get a response from your API Provider.
- Connection: Select a Provider Connection or create a new one (credentials for your API connection). Connections from your installed Connectors are available.
Click "Test API"
-
Body Here you will see the response body from your API Provider.
-
Header Here you will see the header of the response.
-
Request This shows you what exactly was sent to the API.
Return Values
Return values are the expected return values of your API request. These values will be passed to the next steps within Flows and are useful when you need to process data of your request within your Apps logic.
You can add return values manually but adding them automatically via the Suggested Values Section (after an API test) is way easier. However, if the response does not include all the possible return values, adding them manually may be necessary.
Save & Publish
Once all configurations are complete, click the “Save” button to finalize adding your Action. Note that your new settings will only take effect when you republish your Apps.